My first guest post is from Nickie from Typecast, who I recently got to meet at Blog Camp and CyberMummy. She is true to herself and in addition to writing some amazingly inspirational blog posts and supporting other bloggers she also has a whole series of kick-ass blog tutorials. Here Nickie helps you with your SEO!
There has been a bit of discussion recently about putting tags or labels on your blog posts and how important they are. Generally blog posts are categorised (or tagged) to group together similar types of posts.
Labels, tags or categories contribute to your "Search Engine Optimization" (otherwise known as SEO). Simply put, SEO is all about being able to find an appropriate web page among the millions of web pages on the Internet when using free search engines (Google, Yahoo, etc.). It is having the right content, inclusive of labels, so that your web page or blog post is one of the first that people see when their search results appear. If you want to read more then have a look at the SEO Wikipedia page.
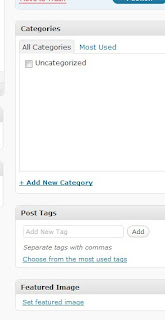
If you use Wordpress as your blogging platform then you'll have a section for "categories" and "tags" to the right of your dashboard (example on the right). You also have facilities when you upload an image to use a title, alternative (ALT) text, captions and for your image to have its own URL. Here is where Wordpress wins hands down as all the facilities for adding the necessary SEO are right there in front of you - no frills.
On Blogger you need to do a little more digging and use the magic HTML again - which I actually think is unnecessary and if you're new to blogging or have limited knowledge of HTML then you risk lowering your opportunities. But we all know that I'll never leave Blogger as it is my comfort blanket and I'm always trying to find ways to adapt Blogger. I see it as my own personal challenge.
Write your blog post in Blogger as usual. Also upload and place your images as you normally would, whether that be through the tools provided or using the "direct link" HTML code from online image storage such as Photobucket. As an aside, using this method makes it easier to find them in the HTML tutorial that is to follow. Remember to always insert HTML in the "Edit HTML" tab rather than in the "Compose" tab. You can flick between the two without losing any of your blog post.
To label your blog posts in Blogger you have to use the section below where you write your blog post (example to the left) and then to add labels to your images you have to set off on a little HTML scavenger hunt (with thanks to Pippa for the additional information).
* * *
Once you have completed your blog post using the WYSIWYG facilities click the Edit HTML tab
Search for your image URL. This may be the Photobucket URL if you have used that facility or it will be something that look like "1.bp.blogspot.com/" followed by a few random numbers and letters. This is still a unique URL for the image but is much messier (see the example below circled in red)
At the end of that URL (example circled in blue) a code that looks like this:
Immediately BEFORE that section of code you need to insert an ALT tag (alternative text tag) like this:
or a description of whatever the picture is. There are two reasons for this - the first is that this is the anchor tag for the image now and the second is that this is the text that will be read out by a screen reader if people use those. Try not to cram this section with too many keywords as it would classed as spamming.
Also, if you want to add a pop-up caption that will appear when someone hovers their cursor over your image then in the same area insert:
TITLE="title of image"
(leave one space after the ALT command)
It is also a good idea to give your images proper names rather than retaining the image number as this helps to anchor SEO too - here your image could be "yellow-hearts-filofax.jpg" with ALT="yellow filofax" follwing it.
* * *
I hope this has helped a little bit. I've tried to keep it simple and explain the reasons why having this knowledge is important if you want your blog post to work for you and to be read by a wider audience.


.JPG)


